MySQL副本集介绍
MySQL InnoDB ReplicaSet(也叫MySQL副本集,有些地方也翻译成MySQL复制集)是在 MySQL 8.0.19 版本(2020-01-13 Released)之后开始支持的,MySQL副本集中拥有一个primary节点,一个或多个secondary节点,它不像MySQL InnoDB Cluster一样提供故障自愈和多主模式,但是它提供手工的方法添加、移除和配置相关节点。
说得直白一点,MySQL副本集其实就是将MySQL主从复制、MySQL Shell、MySQL Router技术融合起来的一种技术,它的优点是可以帮助用户快速、简单的部署和管理主从复制。但是它的不足与限制也非常多。这里仅仅学习、研究MySQL副本集,毕竟技术都是快速向前迭代发展的。说不定哪天就蜕变得非常惊艳。
MySQL副本集的限制
没有自动故障转移功能。在主节点不可用的情况下,需要使用 AdminAPI 手动触发故障转移,然后才能再次进行任何更改。 但是,辅助实例仍可供读取数据。
无法防止由于意外停止或不可用而导致部分数据丢失:在意外停止时未完成的事务可能会丢失。
在意外退出或不可用后无法防止数据不一致。如果手动故障转移提升了一个辅助实例,而前一个主实例仍然可用(例如,由于网络分区), 则裂脑情况可能会导致数据不一致。
InnoDB ReplicaSet 不支持多主模式。允许写入所有成员的经典复制拓扑无法保证数据一致性。
读取横向扩展是有限的。InnoDB ReplicaSet 基于异步复制,因此无法像 Group Replication 那样调整流量控制。
所有从节点(次要成员)都从单一来源复制。对于某些特定的用例,这可能会影响单一来源,例如,大量的小更新。
仅支持运行 MySQL 8.0 及更高版本的实例。
仅支持基于 GTID 的复制,二进制日志文件位置复制与 InnoDB ReplicaSet 不兼容。
仅支持基于行的复制 (RBR),不支持基于语句的复制 (SBR)。
不支持复制过滤
任何实例上都不允许使用非托管复制通道
一个 ReplicaSet 最多由一个主实例组成。 支持一个或多个辅助实例。 尽管可以添加到 ReplicaSet 的辅助节点数量没有限制,但连接到 ReplicaSet 的每个 MySQL Router 都必须监视每个实例。 因此,添加到 ReplicaSet 的实例越多,监控就越多
ReplicaSet 必须由 MySQL Shell 管理。 例如,复制帐户是由 MySQL Shell 创建和管理的。 不支持在 MySQLShell 之外对实例进行配置更改,例如直接使用 SQL 语句更改主实例。 始终使用 MySQL Shell 来处理 InnoDB ReplicaSet。
搭建流程
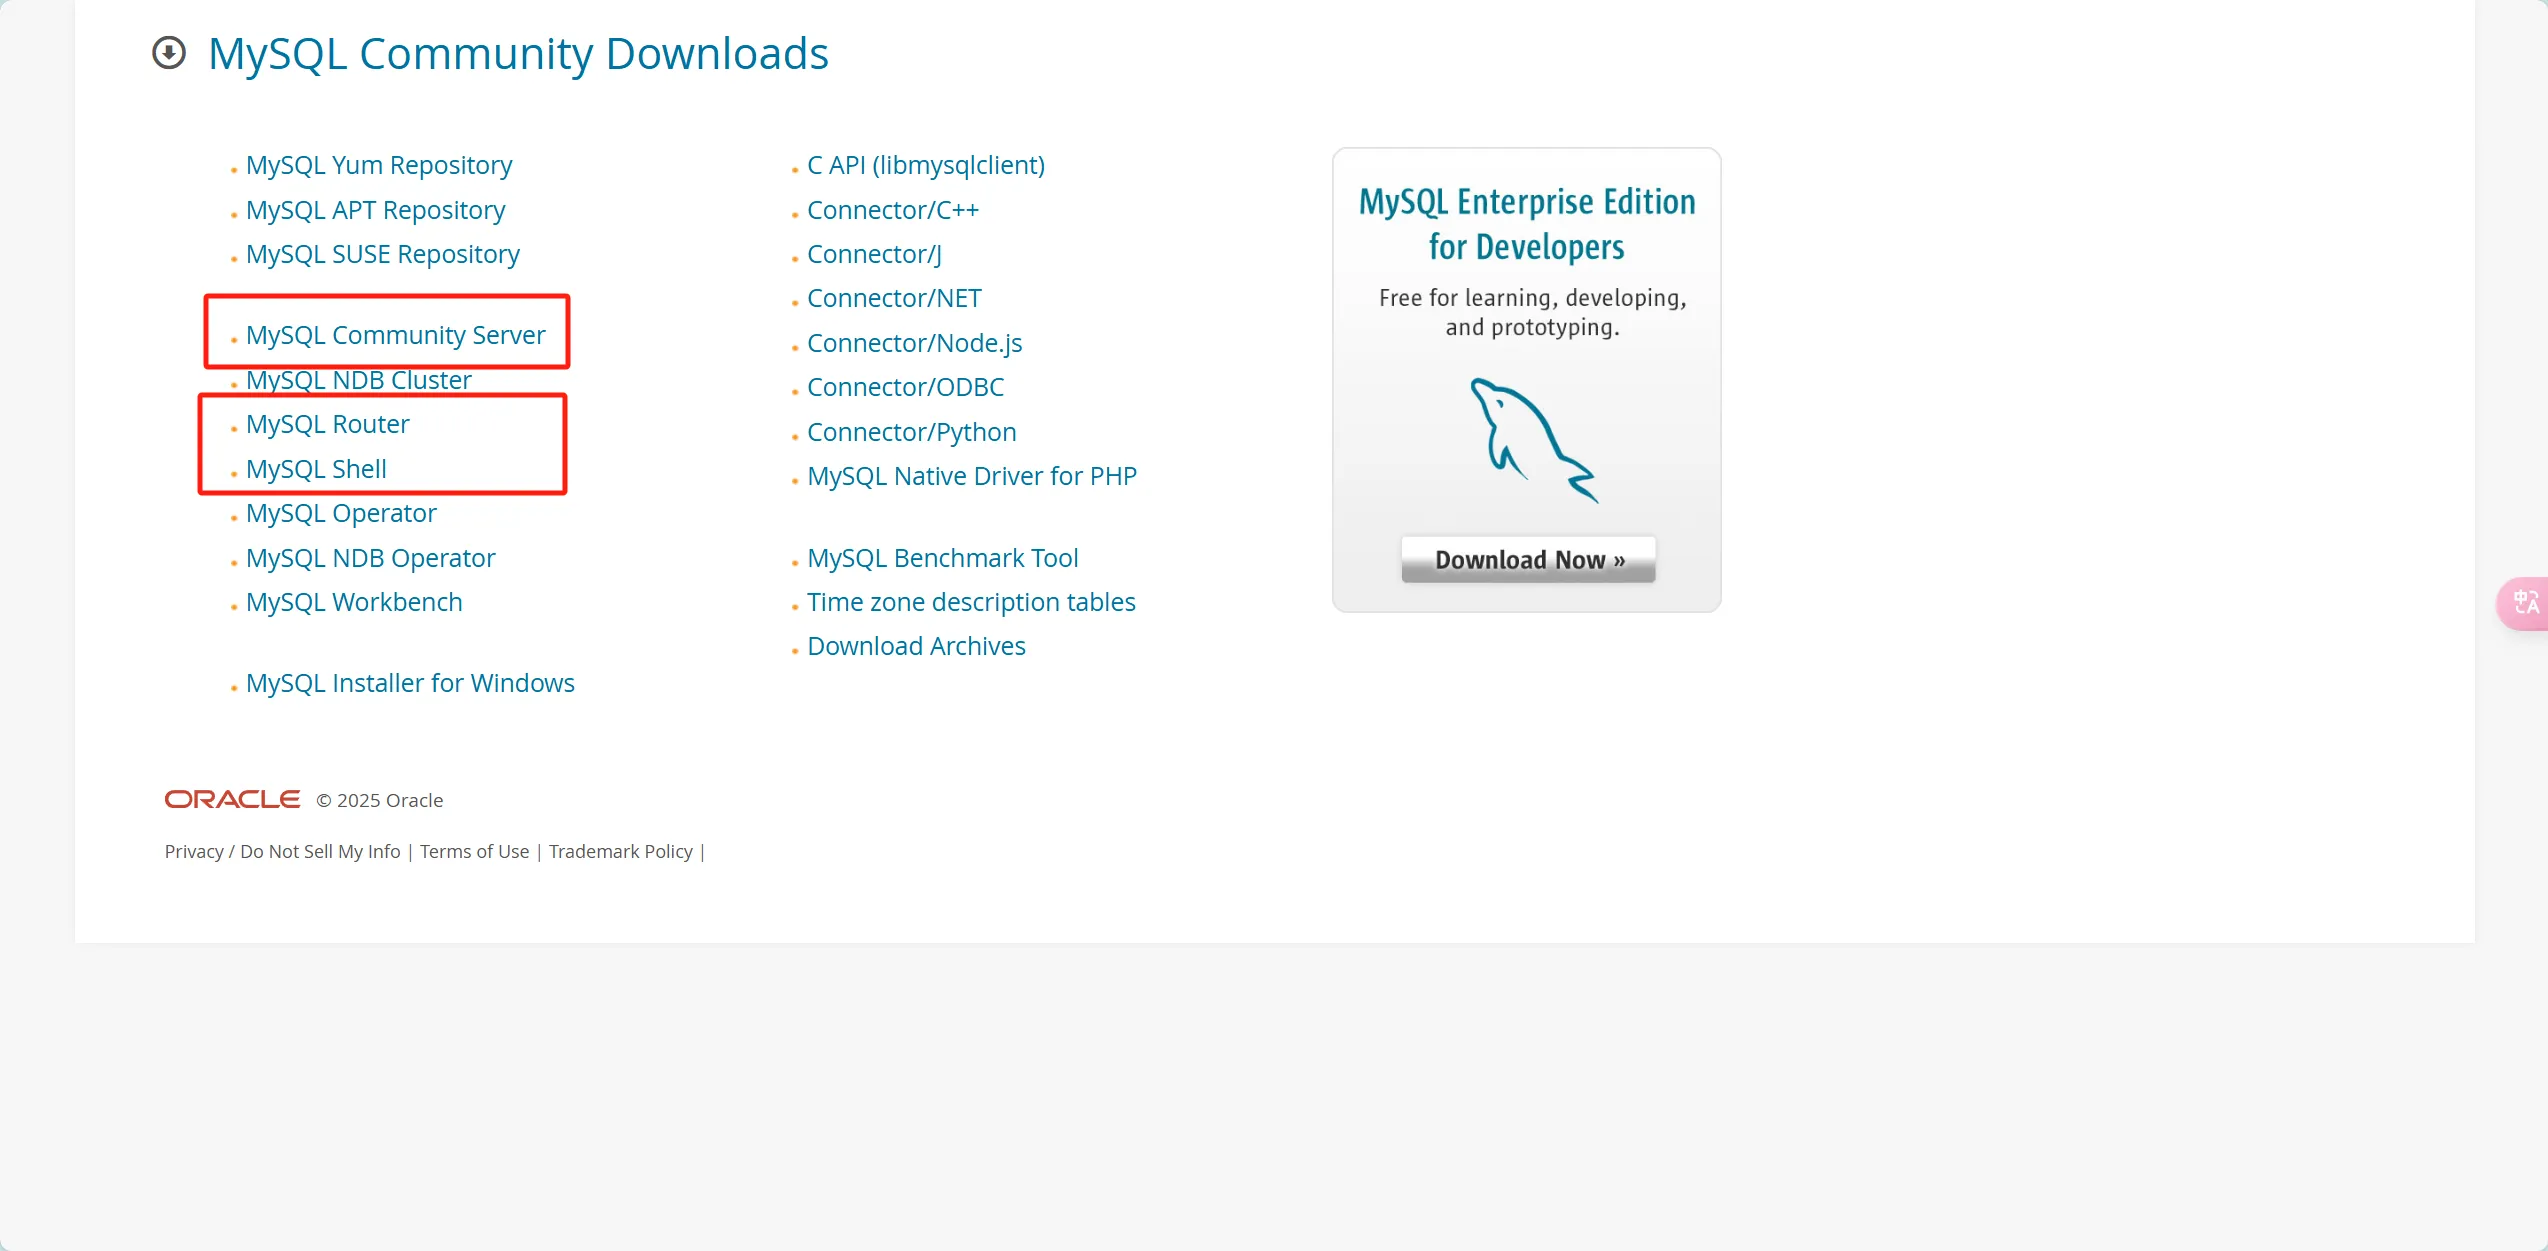
从官网下载 MySQL Server,MySQL Router,MySQL Shell,注意要 8.0 以上的版本
服务器的话笔者准备了四台,把MySQL Router 单独发在一台服务器上,没有条件的话,两台也行,主要是熟悉一下部署就行。系统版本为 alamlinux 9
先给三台服务器重新装上 MySQL,因为这几台机之前已经装好并开启主从复制,后面改造成副本集的时候踩了很多坑,这里为了省麻烦,还是重新初始化一遍。具体过程就不贴出来了,这里贴下配置参数就行。
初始化 MySQL
/*195配置参数*/
[client]
socket = /data/mysql/3306/data/mysql.sock

[mysqld]
server-id = 195
basedir = /usr/local/mysql-8.0.41
datadir = /data/mysql/3306/data/
user = mysql
port = 3306
socket = /data/mysql/3306/data/mysql.sock
pid-file = /data/mysql/3306/data/mysqld.pid
log_error = /data/mysql/3306/data/mysqld.err
log_timestamps = system

gtid_mode = on
log_slave_updates = on
enforce_gtid_consistency=on
binlog_transaction_dependency_tracking=writeset

/*170配置参数*/
[client]
socket = /data/mysql/3306/data/mysql.sock

[mysqld]
server-id = 170
basedir = /usr/local/mysql-8.0.41
datadir = /data/mysql/3306/data/
user = mysql
port = 3306
socket = /data/mysql/3306/data/mysql.sock
pid-file = /data/mysql/3306/data/mysqld.pid
log_error = /data/mysql/3306/data/mysqld.err
log_timestamps = system

gtid_mode = on
log_slave_updates = on
enforce_gtid_consistency=on
binlog_transaction_dependency_tracking=writeset

/*32配置参数*/
[client]
socket = /data/mysql/3306/data/mysql.sock

[mysqld]
server-id = 32
basedir = /usr/local/mysql-8.0.41
datadir = /data/mysql/3306/data/
user = mysql
port = 3306
socket = /data/mysql/3306/data/mysql.sock
pid-file = /data/mysql/3306/data/mysqld.pid
log_error = /data/mysql/3306/data/mysqld.err
log_timestamps = system

gtid_mode = on
log_slave_updates = on
enforce_gtid_consistency=on
binlog_transaction_dependency_tracking=writeset

这里的server-id 有人喜欢用1,2,3,但笔者比较喜欢用服务器ip,比较简单明了,看个人习惯吧
创建rsadmin管理账号
在各个节点上创建账号rsadmin(MySQL Shell使用),因为一般而言,root账号的hostname限定为localhost(127.0.0.1),所以我们单独为MySQL Shell创建一个管理账号。
create user rsadmin@'192.168.31.%' identified by '123.zxc';
grant all on *.* to 'rsadmin'@'192.168.31.%' with grant option;
flush privileges;
检查实例是否符合副本集的条件
dba.configureReplicaSetInstance('[email protected]:3306', {clusterAdmin: "'rsadmin'@'192.168.31.%'"})
第一个参数为要配置 MySQL 实例的连接信息。
第二个参数指定用于管理副本集的专用账户
记得然后用我们新建的 rsadmin 用户登录 mysqlshell
MySQL  192.168.31.195:3306 ssl ssl  JS > dba.configureReplicaSetInstance('[email protected]:3306', {clusterAdmin: "'rsadmin'@'192.168.31.%'"});
Please provide the password for '[email protected]:3306': *******
Save password for '[email protected]:3306'? [Y]es/[N]o/Ne[v]er (default No): yes
Configuring MySQL instance at 192.168.31.32:3306 for use in an InnoDB ReplicaSet...

This instance reports its own address as 192.168.31.32:3306
Clients and other cluster members will communicate with it through this address by default. If this is not correct, the report_host MySQL system variable should be changed.
User 'rsadmin'@'192.168.31.%' already exists and will not be created.

applierWorkerThreads will be set to the default value of 4.

The instance '192.168.31.32:3306' is valid to be used in an InnoDB ReplicaSet.
The instance '192.168.31.32:3306' is already ready to be used in an InnoDB ReplicaSet.

Successfully enabled parallel appliers.
三台机都要检查一下是否符合条件,都出现Successfully 则说明没有问题。如果有不符合的,则会报错,根据报错信息去处理即可。
建副本集kerry_repl
#创建名为kerry_repl的副本集,名字可以根据实际情况设置
 MySQL  192.168.31.195:3306 ssl  JS > var rs = dba.createReplicaSet("kerry_repl")
A new replicaset with instance '192.168.31.195:3306' will be created.

* Checking MySQL instance at 192.168.31.195:3306

This instance reports its own address as 192.168.31.195:3306
192.168.31.195:3306: Instance configuration is suitable.

* Checking connectivity and SSL configuration...
* Updating metadata...

ReplicaSet object successfully created for 192.168.31.195:3306.
Use rs.addInstance() to add more asynchronously replicated instances to this replicaset and rs.status() to check its status.

#添加replication信任(MySQL Shell 8.0.28 及之后的版本创建 InnoDB ReplicaSet 时,如果你有安全需要,可以通过下面函数设置)
rs.setOption('replicationAllowedHost', '192.168.31.0/24')

#检查副本集的状态
MySQL  192.168.31.195:3306 ssl  JS > rs = dba.getReplicaSet()
You are connected to a member of replicaset 'kerry_repl'.
<ReplicaSet:kerry_repl>
 MySQL  192.168.31.195:3306 ssl  JS > rs.status();
{
    "replicaSet": {
        "name": "kerry_repl",
        "primary": "192.168.31.195:3306",
        "status": "AVAILABLE",
        "statusText": "All instances available.",
        "topology": {
            "192.168.31.195:3306": {
                "address": "192.168.31.195:3306",
                "instanceRole": "PRIMARY",
                "mode": "R/W",
                "status": "ONLINE"
            }
        },
        "type": "ASYNC"
    }
}
这里把 195 当作PRIMARY 节点,用那台机当PRIMARY 节点取决于你 mysqlshell 登录那台 MySQL
把另外两台加入到副本集里
MySQL  192.168.31.195:3306 ssl  JS > rs.addInstance('192.168.31.170:3306')
Adding instance to the replicaset...

* Performing validation checks

This instance reports its own address as 192.168.31.170:3306
192.168.31.170:3306: Instance configuration is suitable.

* Checking async replication topology...

* Checking connectivity and SSL configuration...

* Checking transaction state of the instance...

WARNING: A GTID set check of the MySQL instance at '192.168.31.170:3306' determined that it contains transactions that do not originate from the replicaset, which must be discarded before it can join the replicaset.

192.168.31.170:3306 has the following errant GTIDs that do not exist in the replicaset:
5ee60ca3-1c6d-11f0-99a2-bc241113517c:1-4

WARNING: Discarding these extra GTID events can either be done manually or by completely overwriting the state of 192.168.31.170:3306 with a physical snapshot from an existing replicaset member. To use this method by default, set the 'recoveryMethod' option to 'clone'.

Having extra GTID events is not expected, and it is recommended to investigate this further and ensure that the data can be removed prior to choosing the clone recovery method.

Please select a recovery method [C]lone/[A]bort (default Abort): C
* Updating topology
Waiting for clone process of the new member to complete. Press ^C to abort the operation.
* Waiting for clone to finish...
NOTE: 192.168.31.170:3306 is being cloned from 192.168.31.195:3306
** Stage DROP DATA: Completed
** Clone Transfer
    FILE COPY  ############################################################  100%  Completed
    PAGE COPY  ############################################################  100%  Completed
    REDO COPY  ############################################################  100%  Completed

NOTE: 192.168.31.170:3306 is shutting down...

* Waiting for server restart... ready
* 192.168.31.170:3306 has restarted, waiting for clone to finish...
** Stage RESTART: Completed
* Clone process has finished: 74.70 MB transferred in about 1 second (~74.70 MB/s)

** Changing replication source of 192.168.31.170:3306 to 192.168.31.195:3306
** Waiting for new instance to synchronize with PRIMARY...
** Transactions replicated  ############################################################  100%

The instance '192.168.31.170:3306' was added to the replicaset and is replicating from 192.168.31.195:3306.

* Waiting for instance '192.168.31.170:3306' to synchronize the Metadata updates with the PRIMARY...
** Transactions replicated  ############################################################  100%

 MySQL  192.168.31.195:3306 ssl  JS > rs.addInstance('192.168.31.32:3306')
Adding instance to the replicaset...

* Performing validation checks

This instance reports its own address as 192.168.31.32:3306
192.168.31.32:3306: Instance configuration is suitable.

* Checking async replication topology...

* Checking connectivity and SSL configuration...

* Checking transaction state of the instance...

WARNING: A GTID set check of the MySQL instance at '192.168.31.32:3306' determined that it contains transactions that do not originate from the replicaset, which must be discarded before it can join the replicaset.

192.168.31.32:3306 has the following errant GTIDs that do not exist in the replicaset:
1a42b1e6-1c66-11f0-984f-bc24118a3e44:1-6

WARNING: Discarding these extra GTID events can either be done manually or by completely overwriting the state of 192.168.31.32:3306 with a physical snapshot from an existing replicaset member. To use this method by default, set the 'recoveryMethod' option to 'clone'.

Having extra GTID events is not expected, and it is recommended to investigate this further and ensure that the data can be removed prior to choosing the clone recovery method.

Please select a recovery method [C]lone/[A]bort (default Abort): C
* Updating topology
* Waiting for the donor to synchronize with PRIMARY...
** Transactions replicated  ############################################################  100%


Waiting for clone process of the new member to complete. Press ^C to abort the operation.
* Waiting for clone to finish...
NOTE: 192.168.31.32:3306 is being cloned from 192.168.31.170:3306
** Stage DROP DATA: Completed
** Clone Transfer
    FILE COPY  ############################################################  100%  Completed
    PAGE COPY  ############################################################  100%  Completed
    REDO COPY  ############################################################  100%  Completed

NOTE: 192.168.31.32:3306 is shutting down...

* Waiting for server restart... ready
* 192.168.31.32:3306 has restarted, waiting for clone to finish...
** Stage RESTART: Completed
* Clone process has finished: 75.03 MB transferred in about 1 second (~75.03 MB/s)

** Changing replication source of 192.168.31.32:3306 to 192.168.31.195:3306
** Waiting for new instance to synchronize with PRIMARY...
** Transactions replicated  ############################################################  100%

The instance '192.168.31.32:3306' was added to the replicaset and is replicating from 192.168.31.195:3306.

* Waiting for instance '192.168.31.32:3306' to synchronize the Metadata updates with the PRIMARY...
** Transactions replicated  ############################################################  100%

 MySQL  192.168.31.195:3306 ssl  JS > rs.status()
{
    "replicaSet": {
        "name": "kerry_repl",
        "primary": "192.168.31.195:3306",
        "status": "AVAILABLE",
        "statusText": "All instances available.",
        "topology": {
            "192.168.31.170:3306": {
                "address": "192.168.31.170:3306",
                "instanceRole": "SECONDARY",
                "mode": "R/O",
                "replication": {
                    "applierStatus": "APPLIED_ALL",
                    "applierThreadState": "Waiting for an event from Coordinator",
                    "applierWorkerThreads": 4,
                    "receiverStatus": "ON",
                    "receiverThreadState": "Waiting for source to send event",
                    "replicationLag": null,
                    "replicationSsl": "TLS_AES_256_GCM_SHA384 TLSv1.3"
                },
                "status": "ONLINE"
            },
            "192.168.31.195:3306": {
                "address": "192.168.31.195:3306",
                "instanceRole": "PRIMARY",
                "mode": "R/W",
                "status": "ONLINE"
            },
            "192.168.31.32:3306": {
                "address": "192.168.31.32:3306",
                "instanceRole": "SECONDARY",
                "mode": "R/O",
                "replication": {
                    "applierStatus": "APPLIED_ALL",
                    "applierThreadState": "Waiting for an event from Coordinator",
                    "applierWorkerThreads": 4,
                    "receiverStatus": "ON",
                    "receiverThreadState": "Waiting for source to send event",
                    "replicationLag": null,
                    "replicationSsl": "TLS_AES_256_GCM_SHA384 TLSv1.3"
                },
                "status": "ONLINE"
            }
        },
        "type": "ASYNC"
    }
}
创建 mysql router 用户
MySQL Router 和 MySQL Shell 从 8.0.19 开始可以通过--account 创建 mysql router 用户,执行语句如下
MySQL  192.168.31.195:3306 ssl  JS > rs.setupRouterAccount('rsdemorouter')

Missing the password for new account rsdemorouter@%. Please provide one.
Password for new account: *******
Confirm password: *******


Creating user rsdemorouter@%.
Account rsdemorouter@% was successfully created.
启动 mysql router
mkdir -p /data/mysqlrouter
$ mysqlrouter --bootstrap [email protected]:3306 \
--directory /data/mysqlrouter \
--account rsdemorouter \
--conf-bind-address="192.168.31.64" --account-host="192.168.31.%" \
--name='myrouter' --user mysql --force-password-validation
Please enter MySQL password for rsadmin:
# Bootstrapping MySQL Router 8.0.41 (MySQL Community - GPL) instance at '/data/mysqlrouter'...
Please enter MySQL password for rsdemorouter:
- Creating account(s) (only those that are needed, if any)
- Verifying account (using it to run SQL queries that would be run by Router)
- Storing account in keyring
- Adjusting permissions of generated files
- Creating configuration /data/mysqlrouter/mysqlrouter.conf
# MySQL Router 'myrouter' configured for the InnoDB ReplicaSet 'kerry_repl'
After this MySQL Router has been started with the generated configuration
$ ./mysqlrouter -c /data/mysqlrouter/mysqlrouter.conf
InnoDB ReplicaSet 'kerry_repl' can be reached by connecting to:
## MySQL Classic protocol
- Read/Write Connections: localhost:6446
- Read/Only Connections: localhost:6447
## MySQL X protocol
- Read/Write Connections: localhost:6448
- Read/Only Connections: localhost:6449
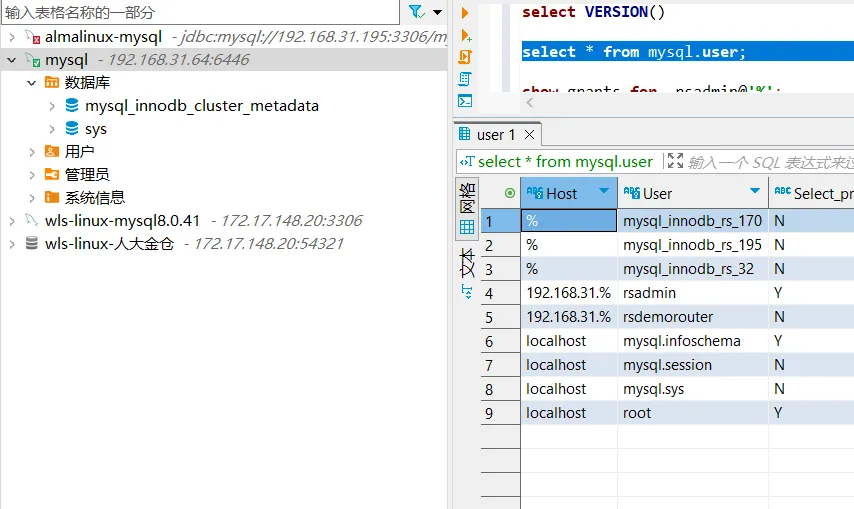
/data/mysql-router-8.0.41/bin/mysqlrouter -c /data/mysqlrouter/mysqlrouter.conf &读写操作连接 6446 端口,读取操作连接 6447,我们用 DBeaver 登录验证下,这里发现有个 bug,左侧的数据库没有显示全,但是 rsadmin 是有权限访问的。
评论