ansible介绍
Ansible是一款简单的运维自动化工具,只需要使用ssh协议连接就可以来进行系统管理,自动化执行命令,部署等任务。
Ansible的特点
1、ansible不需要单独安装客户端,也不需要启动任何服务
2、ansible是python中的一套完整的自动化执行任务模块
3、ansible playbook 采用yaml配置,对于自动化任务执行过一目了然
Ansible组成结构
Ansible
是Ansible的命令工具,核心执行工具;一次性或临时执行的操作都是通过该命令执行。Ansible Playbook
任务剧本(又称任务集),编排定义Ansible任务集的配置文件,由Ansible顺序依次执行,yaml格式。Inventory
Ansible管理主机的清单,默认是/etc/ansible/hosts文件。Modules
Ansible执行命令的功能模块,Ansible2.3版本为止,共有1039个模块。还可以自定义模块。Plugins
插件,模块功能的补充,常有连接类型插件,循环插件,变量插件,过滤插件,插件功能用的较少。API
提供给第三方程序调用的应用程序编程接口
Ansible Inventory文件
Inventory文件通常用于定义要管理的主机的认证信息,例如ssh登录用户名、密码以及key相关信息。可以同时操作一个组的多台主机,组与主机组之间的关系都是通过inventory文件配置。配置文件路径为:/etc/ansible/hosts
基于密码连接
[root@ansible ~]# vim /etc/ansible/hosts
# 方法一 主机+端口+密码
[webserver]
192.168.1.31 ansible_ssh_port=22 ansible_ssh_user=root ansible_ssh_pass="123456"
192.168.1.32 ansible_ssh_port=22 ansible_ssh_user=root ansible_ssh_pass="123456"
192.168.1.33 ansible_ssh_port=22 ansible_ssh_user=root ansible_ssh_pass="123456"
192.168.1.36 ansible_ssh_port=22 ansible_ssh_user=root ansible_ssh_pass="123456"


# 方法二 主机+端口+密码
[webserver]
192.168.1.3[1:3] ansible_ssh_user=root ansible_ssh_pass="123456"


# 方法二 主机+端口+密码
[webserver]
192.168.1.3[1:3]
[webserver:vars]
ansible_ssh_pass="123456"
小tips,用密码连接可能会报几个错误,这里我简单说一下。
"msg": "Using a SSH password instead of a key is not possible because Host Key checking is enabled and sshpass does not support this. Please add this host's fingerprint to your known_hosts file to manage this host."
解决方法:
禁用主机密钥检查(不推荐用于生产环境,因为这样会降低安全性):
在你的 Ansible 配置文件 (ansible.cfg) 中,你可以禁用主机密钥检查。找到 vi /etc/ansible/ansible.cfg 文件,添加或修改以下内容:
iniCopy Code[defaults]
host_key_checking = False
这会禁用主机密钥检查,但要注意,这可能会带来安全风险,因为你可能会连接到一个伪装的主机。
"msg": "Failed to connect to the host via ssh: Unable to negotiate with 173.16.243.25 port 22: no matching cipher found. Their offer: 3des-cbc", "unreachable": true }
这个错误表明你的客户端(例如 Ansible)与目标主机在 SSH 连接时无法达成协议,因为目标主机仅支持 3des-cbc 加密算法,而你的客户端不支持这个算法。3des-cbc 是一种较旧的加密算法,现在被认为是不够安全的,因此很多现代 SSH 客户端可能已经禁用它。
解决方法:
更新目标主机的 SSH 配置:
如果你有权限访问目标主机,可以尝试更新目标主机的 SSH 服务器配置,以支持更现代的加密算法。你可以在目标主机的 SSH 配置文件 /etc/ssh/sshd_config 中添加或修改以下设置:
bashCopy CodeCiphers aes256-ctr,aes192-ctr,aes128-ctr然后重启 SSH 服务:
bashCopy Codesudo systemctl restart sshd这将启用更现代的加密算法。
调整客户端的 SSH 配置:
如果你不能更新目标主机的配置,可以尝试调整客户端的 SSH 配置以支持旧的加密算法。不过,这种方法存在安全风险,不推荐在生产环境中使用。
修改你的 SSH 客户端配置文件 ~/.ssh/config,添加对 3des-cbc 的支持:
iniCopy CodeHost 173.16.243.25
    Ciphers +3des-cbc
这会允许你的 SSH 客户端使用 3des-cbc 加密算法与目标主机连接。
基于秘钥连接
基于秘钥连接需要先创建公钥和私钥,并发送给被管理机器。
1) 生成公私钥
[root@ansible ~]# ssh-keygen
[root@ansible ~]# for i in {1,2,3,6}; do ssh-copy-id -i 192.168.1.3$i ; done
2) 配置连接
[root@ansible ~]# vim /etc/ansible/hosts
# 方法一 主机+端口+密钥
[webserver]
192.168.1.31:22
192.168.1.32
192.168.1.33
192.168.1.36

# 方法一 别名主机+端口+密钥
[webserver]
node1 ansible_ssh_host=192.168.1.31 ansible_ssh_port=22
node2 ansible_ssh_host=192.168.1.32 ansible_ssh_port=22
node3 ansible_ssh_host=192.168.1.33 ansible_ssh_port=22
node6 ansible_ssh_host=192.168.1.36 ansible_ssh_port=22
主机组的使用
# 主机组变量名+主机+密码
[apache]
192.168.1.36
192.168.1.33
[apache.vars]
ansible_ssh_pass='123456'

# 主机组变量名+主机+密钥
[nginx]
192.168.1.3[1:2]

# 定义多个组,把一个组当另外一个组的组员
[webserver:children]  #webserver组包括两个子组:apache nginx
apache
nginx
临时指定inventory
1)先编辑一个主机定义清单
[root@ansible ~]# vim /etc/dockers
[dockers]
192.168.1.31 ansible_ssh_pass='123456'
192.168.1.32
192.168.1.332)在执行命令是指定inventory
[root@ansible ~]# ansible dockers -m ping -i /etc/dockers -o
192.168.1.33 | SUCCESS => {"ansible_facts": {"discovered_interpreter_python": "/usr/bin/python"}, "changed": false, "ping": "pong"}
192.168.1.32 | SUCCESS => {"ansible_facts": {"discovered_interpreter_python": "/usr/bin/python"}, "changed": false, "ping": "pong"}
192.168.1.31 | SUCCESS => {"ansible_facts": {"discovered_interpreter_python": "/usr/bin/python"}, "changed": false, "ping": "pong"}
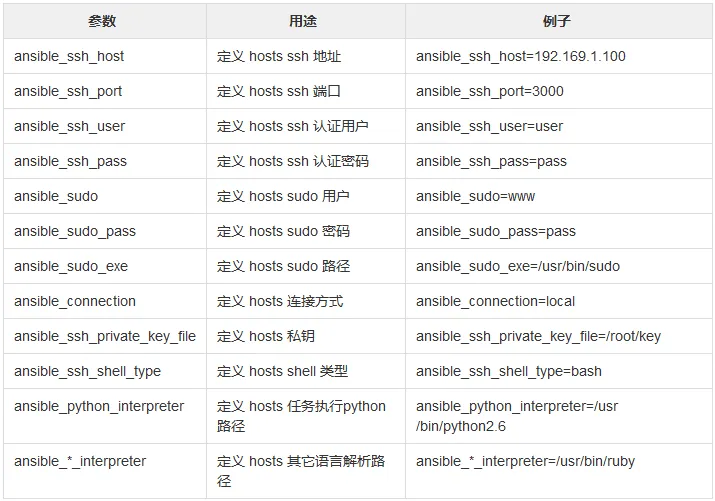
Inventory内置参数

Ansible Ad-Hoc
ad-hoc临时的,在ansible中是指需要快速执行,并且不需要保存的命令。说白了就是执行简单的命令(一条命令)。对于复杂的命令则为playbook,类似于saltstack的state sls状态文件。
ansible命令格式
1)常用命令参数
[root@ansible ~]# ansible -h
Usage: ansible <host-pattern> [options]
-a MODULE_ARGS   #模块参数
-C, --check  #检查语法
-f FORKS #并发
--list-hosts #列出主机列表
-m MODULE_NAME #模块名字
-o 使用精简的输出
2)示例
[root@ansible ~]# ansible webserver -m shell -a 'uptime' -o
192.168.1.36 | CHANGED | rc=0 | (stdout)  13:46:14 up 1 day,  9:20,  4 users,  load average: 0.00, 0.00, 0.00
192.168.1.33 | CHANGED | rc=0 | (stdout)  21:26:33 up 1 day,  8:51,  3 users,  load average: 0.00, 0.01, 0.05
192.168.1.31 | CHANGED | rc=0 | (stdout)  21:26:33 up 1 day,  8:50,  3 users,  load average: 0.00, 0.01, 0.05
192.168.1.32 | CHANGED | rc=0 | (stdout)  21:26:33 up 1 day,  8:59,  3 users,  load average: 0.00, 0.01, 0.05
3)命令说明

host-pattern格式
目标target主机,主机组匹配方式
主机的匹配
#  一台目标主机
[root@ansible ~]# ansible 192.168.1.31 -m ping

# 多台目标主机
[root@ansible ~]# ansible 192.168.1.31,192.168.1.32 -m ping

# 所有目标主机
[root@ansible ~]# ansible all -m ping
组的匹配
# 组的配置信息如下:这里定义了一个nginx组和一个apache组
[root@ansible ~]# ansible nginx --list
  hosts (2):
    192.168.1.31
    192.168.1.32
[root@ansible ~]# ansible apache --list
  hosts (3):
    192.168.1.36
    192.168.1.33
    192.168.1.32

# 一个组的所有主机匹配
[root@ansible ~]# ansible apache -m ping

# 匹配apache组中有,但是nginx组中没有的所有主机
[root@ansible ~]# ansible 'apache:!nginx' -m ping -o
192.168.1.36 | SUCCESS => {"ansible_facts": {"discovered_interpreter_python": "/usr/bin/python"}, "changed": false, "ping": "pong"}
192.168.1.33 | SUCCESS => {"ansible_facts": {"discovered_interpreter_python": "/usr/bin/python"}, "changed": false, "ping": "pong"}

# 匹配apache组和nginx组中都有的机器(并集)
[root@ansible ~]# ansible 'apache:&nginx' -m ping -o
192.168.1.32 | SUCCESS => {"ansible_facts": {"discovered_interpreter_python": "/usr/bin/python"}, "changed": false, "ping": "pong"}

# 匹配apache组nginx组两个组所有的机器(并集);等于ansible apache,nginx -m ping
[root@ansible ~]# ansible 'apache:nginx' -m ping -o
192.168.1.32 | SUCCESS => {"ansible_facts": {"discovered_interpreter_python": "/usr/bin/python"}, "changed": false, "ping": "pong"}
192.168.1.31 | SUCCESS => {"ansible_facts": {"discovered_interpreter_python": "/usr/bin/python"}, "changed": false, "ping": "pong"}
192.168.1.33 | SUCCESS => {"ansible_facts": {"discovered_interpreter_python": "/usr/bin/python"}, "changed": false, "ping": "pong"}
192.168.1.36 | SUCCESS => {"ansible_facts": {"discovered_interpreter_python": "/usr/bin/python"}, "changed": false,
评论